これはなに

Next.js 14のSSGの環境構築をしたときのメモ。
環境
WSL2 Ubuntu 22.04.2 LTS
Docker version 24.0.6
VS Code 1.84.0
Next 14.0.1
環境構築
Dockerfileとdevcontainer.jsonを作って環境を構築する。
FROM node:20-slim

EXPOSE 3000

RUN apt-get update -y \
    && DEBIAN_FRONTEND=noninteractive \
    apt-get install -y --no-install-recommends \
    git \
    locales \
    tzdata \
    xsel \
    && apt-get clean \
    && rm -rf /var/lib/apt/lists/*

RUN locale-gen ja_JP.UTF-8 \
    && localedef -f UTF-8 -i ja_JP ja_JP.UTF-8
ENV TZ=Asia/Tokyo \
    LANG=ja_JP.UTF-8 \
    LANGUAGE=ja_JP:jp \
    LC_ALL=ja_JP.UTF-8

RUN npm install -g npm

USER node{
"build": {
"dockerfile": "./Dockerfile",
"context": ".."
},
"forwardPorts": [
3000
],
"customizations": {
"vscode": {
"extensions": [
"PulkitGangwar.nextjs-snippets",
"dbaeumer.vscode-eslint",
"esbenp.prettier-vscode"
]
}
}
}必須の拡張機能はdevcontainer.jsonに書く。必須でないものは.vscode/extensions.jsonに記述する。.vscode/extensions.jsonに記述した後、VS Codeの拡張機能のタブにて@recommendedで検索すると、ワークスペースの推奨事項にそれらの拡張機能が表示される。
{
  "recommendations": [
    "oderwat.indent-rainbow", // インデントに色を付ける
    "mohammadbaqer.better-folding", // 折り畳みを見やすくする
    "streetsidesoftware.code-spell-checker", // スペルチェック
    "naumovs.color-highlight", // カラーコードをその色でハイライト
    "igorsbitnev.error-gutters", // エラーが出ている横にアイコンをつける
    "saikou9901.evilinspector", // 全角スペース強調
    "mhutchie.git-graph", // Gitのコミット履歴を見やすくできる
    "donjayamanne.githistory", // ファイルごとの変更履歴を見やすくできる
    "github.copilot", // コード書くときのサポーター(有料)
    "kisstkondoros.vscode-gutter-preview",
    "christian-kohler.path-intellisense",
    "gruntfuggly.todo-tree", // TODOの強調
    "shardulm94.trailing-spaces", // 行末の半角スペース強調
    "visualstudioexptteam.vscodeintellicode" // TypeScript書くときに補助してくれる
  ]
}
VS Code拡張機能のDev Containersをローカルにインストールする。その後、Ctrl + Shift + Pでコマンドパレットを開き、Dev Containers: Reopen in Containerを実行する。これにより、Dockerfileがビルドされ、VS Codeがコンテナにアタッチされる。
Node.js環境の確認
コンテナにアタッチされたVS Codeのターミナルで、node -vとnpm -vを実行する。
$ node -v
v20.9.0
$ npm -v
10.2.3
Git管理する
プロジェクトをgit管理下に置く。
git initbranch名をデフォルトでmainにしていない場合はwarningが出るので、mainにしておく。
git branch -m mainアプリのひな型を作成する
Next.jsのアプリのひな型を作る。下記コマンドを実行する。
npx create-next-app@latestプロジェクトの設定をいろいろ聞かれるので答える。
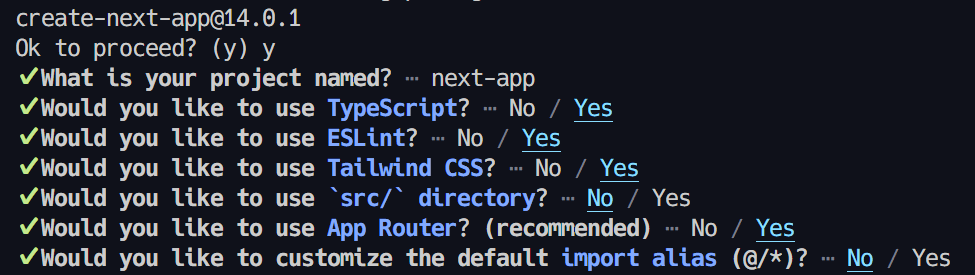
コンソール出力のログ
$ npx create-next-app@latest
Need to install the following packages:
create-next-app@14.0.1
Ok to proceed? (y) y
✔ What is your project named? … next-app
✔ Would you like to use TypeScript? … No / Yes
✔ Would you like to use ESLint? … No / Yes
✔ Would you like to use Tailwind CSS? … No / Yes
✔ Would you like to use `src/` directory? … No / Yes
✔ Would you like to use App Router? (recommended) … No / Yes
✔ Would you like to customize the default import alias (@/*)? … No / Yes
Creating a new Next.js app in /workspaces/path/next-app.

Using npm.

Initializing project with template: app-tw


Installing dependencies:
- react
- react-dom
- next

Installing devDependencies:
- typescript
- @types/node
- @types/react
- @types/react-dom
- autoprefixer
- postcss
- tailwindcss
- eslint
- eslint-config-next


added 331 packages, and audited 332 packages in 25s

116 packages are looking for funding
  run `npm fund` for details

found 0 vulnerabilities
Success! Created next-app at /workspaces/path/next-appすると、プロジェクト名(上記だとnext-app)のディレクトリが作成され、アプリのひな形が作られる。下記コマンドで起動するか確認する。
cd next-app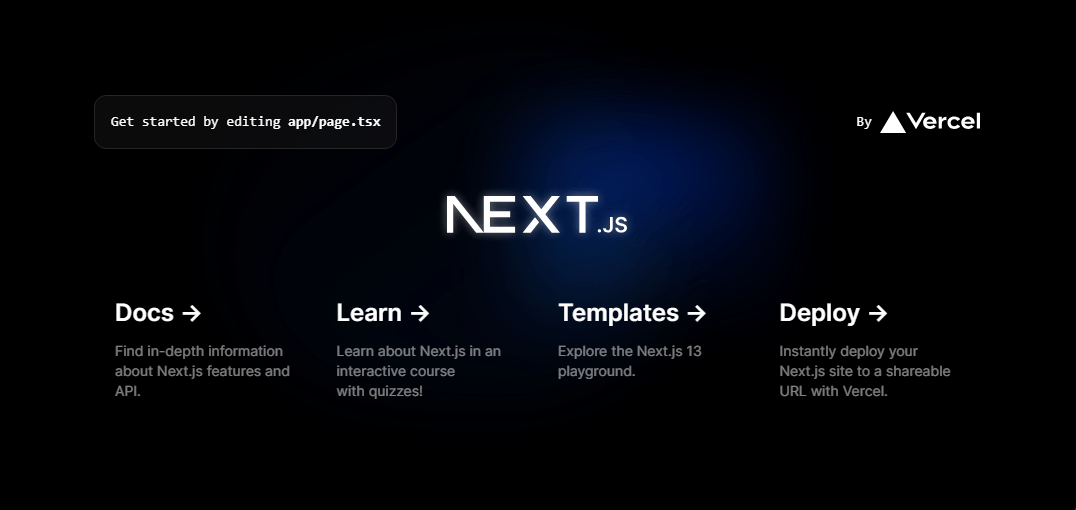
npm run devhttp://localhost:3000にアクセスして、下記のようなデフォルトページが表示されることを確認する。
ページの表示はCtrl + Cで終了できる。
SSGのためのプロジェクトの設定を変更する
next.config.jsを変更し、reactStrictModeを有効にしておく。
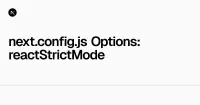

また、静的サイトにするため、output: 'export'を追加する。
変更後のnext.config.jsは下記のとおり。
/** @type {import('next').NextConfig} */
const nextConfig = {
  reactStrictMode: true,
  output: 'export',
}

module.exports = nextConfig静的サイトの場合は、output: 'export'を設定した後にnpm run buildし、これにより、npx serve@latest outすることでビルドした静的サイトをプレビューできる。
npm run buildnpm run buildのログ
$ npm run build

> next-app@0.1.0 build
> next build

   ▲ Next.js 14.0.1

 ✓ Creating an optimized production build
 ✓ Compiled successfully
 ✓ Linting and checking validity of types
 ✓ Collecting page data
 ✓ Generating static pages (5/5)
 ✓ Finalizing page optimization

Route (app)                              Size     First Load JS
┌ ○ /                                    5.28 kB        90.4 kB
└ ○ /_not-found                          882 B            86 kB
+ First Load JS shared by all            85.2 kB
  ├ chunks/472-39c72660b90e2701.js       30 kB
  ├ chunks/fd9d1056-39de21f001c52188.js  53.2 kB
  ├ chunks/main-app-5c586790629e224c.js  232 B
  └ chunks/webpack-2f0f07802d1106cf.js   1.69 kB


○  (Static)  prerendered as static HTML
npx serve@latest outnpx serve@latest outのログ
$ npx serve@latest out
Need to install the following packages:
serve@14.2.1
Ok to proceed? (y) y

   ┌────────────────────────────────────────┐
   │                                        │
   │   Serving!                             │
   │                                        │
   │   - Local:    http://localhost:3000    │
   │   - Network:  http://172.17.0.3:3000   │
   │                                        │
   │   Copied local address to clipboard!   │
   │                                        │
   └────────────────────────────────────────┘

 HTTP  2023/11/4 5:41:17 127.0.0.1 GET /
 HTTP  2023/11/4 5:41:17 127.0.0.1 Returned 200 in 7 ms
 HTTP  2023/11/4 5:41:17 127.0.0.1 GET /_next/static/media/c9a5bc6a7c948fb0-s.p.woff2
 HTTP  2023/11/4 5:41:17 127.0.0.1 Returned 200 in 1 ms
...プレビューはCtrl + Cで終了できる。
毎回npx serve@latest outと打つのは面倒なので、package.jsonにコマンドを追加する。npm run serveでbuildした静的サイトをプレビューできる。
{
  "name": "next-app",
  "version": "0.1.0",
  "private": true,
  "scripts": {
    "dev": "next dev",
    "build": "next build",
    "start": "next start",
    "lint": "next lint",
+   "serve": "npx serve@latest out"
  },
  "dependencies": {
    "react": "^18",
    "react-dom": "^18",
    "next": "14.0.1"
  },
  "devDependencies": {
    "typescript": "^5",
    "@types/node": "^20",
    "@types/react": "^18",
    "@types/react-dom": "^18",
    "autoprefixer": "^10.0.1",
    "postcss": "^8",
    "tailwindcss": "^3.3.0",
    "eslint": "^8",
    "eslint-config-next": "14.0.1"
  }
}
Linterがtsxファイルのエラーも検知するようにする
npm run lint(あるいはnpx next lint)を実行してもTypeScriptのコードのエラーは表示されない。これを表示されるように変更する。


まず、必要なプラグインをインストールする。
npm i -D @typescript-eslint/eslint-plugin次に、.eslintrc.jsonを変更する。extendsとparserOptionsの変更は必須。他は任意。
{
  "root": true,
  "extends": [
    "plugin:@typescript-eslint/recommended",
    "next/core-web-vitals"
  ],
  "parserOptions": {
    "project": "./tsconfig.json"
  },
  "rules": {
    "@typescript-eslint/no-unused-vars": "error",
    "@typescript-eslint/no-explicit-any": "error",
    "@typescript-eslint/no-unsafe-call": "error",
    "@typescript-eslint/no-unsafe-member-access": "error",
    "@typescript-eslint/no-unsafe-return": "error"
  }
}ここまで設定すれば、npm run lintで.tsxのエラーが表示されるようになる。これ以降の設定は、必要であれば設定する。
VSCodeの設定を変更して、linterがVS Codeでも正常に動くようにする。
{
  // Linter
  "eslint.workingDirectories": [
    "./next-app",
  ],
  "editor.codeActionsOnSave": {
    "source.fixAll": false,
    "source.fixAll.eslint": true
  }
}package.jsonのlintコマンドを変更し、.gitignoreに指定しているファイルは無視するように変更する。
{
  "scripts": {
    "dev": "next dev",
    "build": "next build",
    "start": "next start",
-   "lint": "next lint",
+   "lint": "next lint --ignore-path .gitignore",
    "serve": "npx serve@latest out"
  },
}
Prettierを入れる
FormatterとしてPrettierを入れる。まず、パッケージをインストールする。
npm i -D prettier eslint-config-prettier次に、Prettierの設定ファイルを作る。この設定は好みや方針により異なる。
{
  "semi": true,
  "trailingComma": "all",
  "singleQuote": true,
  "printWidth": 80,
  "tabWidth": 2
}加えて、.eslintrc.jsonにPrettierを追加する。
{
  "root": true,
  "extends": [
    "plugin:@typescript-eslint/recommended",
    "next/core-web-vitals",
+   "prettier"
  ],
  "parserOptions": {
    "project": "./tsconfig.json"
  },
  "rules": {
    "@typescript-eslint/no-unused-vars": "error",
    "@typescript-eslint/no-explicit-any": "error",
    "@typescript-eslint/no-unsafe-call": "error",
    "@typescript-eslint/no-unsafe-member-access": "error",
    "@typescript-eslint/no-unsafe-return": "error"
  }
}
最後に、package.jsonにformatコマンドを追加する。
{
  "scripts": {
    "dev": "next dev",
    "build": "next build",
    "start": "next start",
    "lint": "next lint --ignore-path .gitignore",
+   "format": "prettier --write --ignore-path .gitignore .",
    "serve": "npx serve@latest out"
  },
}
追加したらnpm run formatを実行して動作を確認する。
npm run formatVS Codeの場合は下記の設定を追加すると、保存時やタイプ時に自動でフォーマットされる。
{
  // formatter
  "editor.defaultFormatter": "esbenp.prettier-vscode",
  "editor.formatOnSave": true,
  "editor.formatOnPaste": true,
  "editor.formatOnType": true,
}
コミット時にlinterとformatterを自動実行する
コミット時にnpm run lintとnpm run formatを実行し、エラーが出る場合はコミットできないようにする。


huskyとlint-stagedを入れる
まず、必要なパッケージをインストールする。
npm i -D husky lint-staged次に、husky-initコマンドを実行する。環境によりコマンドが異なるため、実行するコマンドの詳細はhuskyの公式サイトを参照すること。
npx husky-init && npm install.gitディレクトリとpackage.jsonファイルが同じ階層に存在しない場合は、下記のようなエラーが発生する。
$ npx husky-init && npm install
Need to install the following packages:
husky-init@8.0.0
Ok to proceed? (y) y
husky-init updating package.json
  setting prepare script to command "husky install"
/home/node/.npm/_npx/1ab9c0f68ac2536e/node_modules/husky/lib/index.js:23
        throw new Error(`.git can't be found (see ${url})`);
        ^

Error: .git can't be found (see https://typicode.github.io/husky/#/?id=custom-directory)
    at install (/home/node/.npm/_npx/1ab9c0f68ac2536e/node_modules/husky/lib/index.js:23:15)
    at Object.<anonymous> (/home/node/.npm/_npx/1ab9c0f68ac2536e/node_modules/husky-init/lib/bin.js:16:21)
    at Module._compile (node:internal/modules/cjs/loader:1241:14)
    at Module._extensions..js (node:internal/modules/cjs/loader:1295:10)
    at Module.load (node:internal/modules/cjs/loader:1091:32)
    at Module._load (node:internal/modules/cjs/loader:938:12)
    at Function.executeUserEntryPoint [as runMain] (node:internal/modules/run_main:83:12)
    at node:internal/main/run_main_module:23:47

Node.js v20.9.0このエラーへの対処法は、huskyの公式サイトに書かれているとおりで、npx husky-initによってpackage.jsonに追加されたprepareスクリプトを変更する。
たとえば、プロジェクト名がnext-appの場合は下記のように変更する。
{
  "scripts": {
-   "prepare": "husky install"
+   "prepare": "cd .. && husky install next-app/.husky"
  },
}
変更したら、再度npm i(あるいはnpm install)を実行する。
npm i成功すると、.huskyディレクトリが生成される。
huskyにhookを追加する
.huskyディレクトリが生成されたら、自動実行のためのhookを追加する。今回は下記のコマンドでpre-commitのhookを追加する。
npx husky add .husky/pre-commit "npx lint-staged"実行すると、.huskyディレクトリに下記のpre_commitファイルが生成される。
#!/usr/bin/env sh
. "$(dirname -- "$0")/_/husky.sh"

npx lint-staged.gitディレクトリとpackage.jsonファイルが同じ階層に存在しない場合は、下記のように階層を移動するコマンドを追加する必要がある。
#!/usr/bin/env sh
. "$(dirname -- "$0")/_/husky.sh"

+ cd next-app  # package.jsonのある階層に移動する
npx lint-staged
ここまでできたら、lint-stagedの設定に移る。
lint-stagedの設定をする
Next.jsにおけるlint-stagedの設定は特殊である。詳細はNext.jsの公式サイトを参照すること。
要するに、Next.jsにおいてnext lintとlint-stagedを共存させる場合は、.lintstagedrc.jsファイルを作成し、そこに設定を記す必要がある。
公式に載っている.lintstagedrc.jsは下記のとおり。
const path = require('path')

const buildEslintCommand = (filenames) =>
  `next lint --fix --file ${filenames
    .map((f) => path.relative(process.cwd(), f))
    .join(' --file ')}`

module.exports = {
  '*.{js,jsx,ts,tsx}': [buildEslintCommand],
}上記のように、module.exportsに、適用するファイルと実行するコマンドのペアを記述する。たとえば、自動修正しないlinterとformatterを実行する場合は、下記のようになる。
const path = require('path');

const buildLintCommand = (filenames) =>
  `next lint --file ${filenames
    .map((f) => path.relative(process.cwd(), f))
    .join(' --file ')}`;

const buildFormatCommand = (filenames) =>
  `prettier --check --debug-check ${filenames
    .map((f) => path.relative(process.cwd(), f))
    .join(' ')}`;

module.exports = {
  'app/**/*.{js,jsx,ts,tsx}': [buildLintCommand],
  'pages/**/*.{js,jsx,ts,tsx}': [buildLintCommand],
  '*.{js,jsx,ts,tsx,json,css}': [buildFormatCommand],
};
以上までの設定で、コミット時にlinterとformatterが自動で実行され、通らない場合はコミットできなくなる。
コミットメッセージを自動チェックして統一する
コミットメッセージのフォーマットを統一するため、commitlintを入れる。

commitlintを入れる
まず、パッケージをインストールする。
npm install --save-dev @commitlint/{cli,config-conventional}次に、下記のコマンドを実行してcommitlint.config.jsを作成する。
echo "module.exports = { extends: ['@commitlint/config-conventional'] };" > commitlint.config.js作成されたcommitlint.config.jsは以下のようになる。
module.exports = {
  extends: ['@commitlint/config-conventional'],
};上記の代わりに、package.jsonに記述してもよい。
{
  "commitlint": {
    "extends": [
      "@commitlint/config-conventional"
    ]
  }
}
以上でcommitlintが動作するようになったので、実行されるか確認する。
npx commitlint --from HEAD~1 --to HEAD --verbose実行されれば、下記のようなログが出力される。
$ npx commitlint --from HEAD~1 --to HEAD --verbose
⧗   input: build: set up husky and lint-staged pre-commit
✔   found 0 problems, 0 warnings
コミット時にcommitlintを自動実行する
コミット時にcommitlintが自動実行されるように設定する。commitlintはcommit-msgフックで実行する。下記のコマンドを実行して、huskyからcommit-msgフックを追加する。
npx husky add .husky/commit-msg 'npx --no -- commitlint --edit ${1}'これにより、.husky/commit-msgファイルが作成される。
#!/usr/bin/env sh
. "$(dirname -- "$0")/_/husky.sh"

npx --no -- commitlint --edit ${1}.gitディレクトリとpackage.jsonが同一階層にない場合は、下記のように階層を移動するコマンドを追加する必要がある。
#!/usr/bin/env sh
. "$(dirname -- "$0")/_/husky.sh"

+ cd next-app  # package.jsonのある階層に移動する
npx --no -- commitlint --edit ${1}
これで、コミット時にcommitlintが実行されるようになる。
commitlintのルールを変更する
commitlintのルールは、commitlint.config.jsにルールを追記することで上書きできる。デフォルトの設定および上書き方法は、下記公式サイトに記述されている。
たとえば、subject-max-lengthを50に変更する場合は、下記のようにルールを追記する。
module.exports = {
  extends: ['@commitlint/config-conventional'],

+ rules: {
+   'subject-max-length': [2, 'always', 50],
+ },
};

ルールは、{ルール名}: [{レベル:0|1|2}, '{可否:always|never}', {値}]の形式で記述する。レベルは各数値が下記段階に該当する。
- 0: 無効
- 1: 警告
- 2: エラー
オレオレルールはこんな感じ。
module.exports = {
  extends: ['@commitlint/config-conventional'],

  rules: {
    'type-case': [2, 'always', 'lower-case'],
    'scope-case': [2, 'always', 'lower-case'],
    'subject-max-length': [2, 'always', 50],
    'body-full-stop': [2, 'always', '.'],
    'body-leading-blank': [2, 'always'],
    'body-max-line-length': [2, 'always', 72],
    'body-case': [2, 'always', 'sentence-case'],
    'footer-leading-blank': [2, 'always'],
    'footer-max-line-length': [2, 'always', 72],
  },
};
参考文献・URL
参考文献・URLは適宜記事内に示した。