
What is this?

These are some notes on what I did and what I learned while reviewing my GitHub repository security settings, following the article below.
When GitHub itself says these are settings “every GitHub maintainer should enable,” you kind of have to check, right?


There are six settings in total, and apparently you can get through all of them in under 30 minutes. Really?
Conclusion
For public repositories, enabling all of the relevant settings under “Security and quality” improves the security of the repository.
For personal private repositories, however, only the following settings are available:
- Dependabot alerts
- Secret scanning alerts
1. Add a SECURITY.md file
This is mainly useful for public repositories.
A SECURITY.md file is used to tell users how to report security vulnerabilities in your project. According to the official documentation, it lets you “add information about supported versions of your project and how to report a vulnerability.” The article referenced above uses systemd’s security policy as an example.


If vulnerability details are posted in a public issue, malicious users may be able to exploit them. For that reason, it is important to provide a reporting channel separate from public issues. Clearly specifying where vulnerabilities should be reported helps improve the security of the repository.
The SECURITY.md file can be placed in any of the following locations1:
- The
.githubdirectory - The repository root
- The
docsdirectory
This corresponds to the “Security policy” section under a repository’s “Security and quality” settings. If it shows as Disabled, as in the image below, it means that the repository does not have a SECURITY.md file.
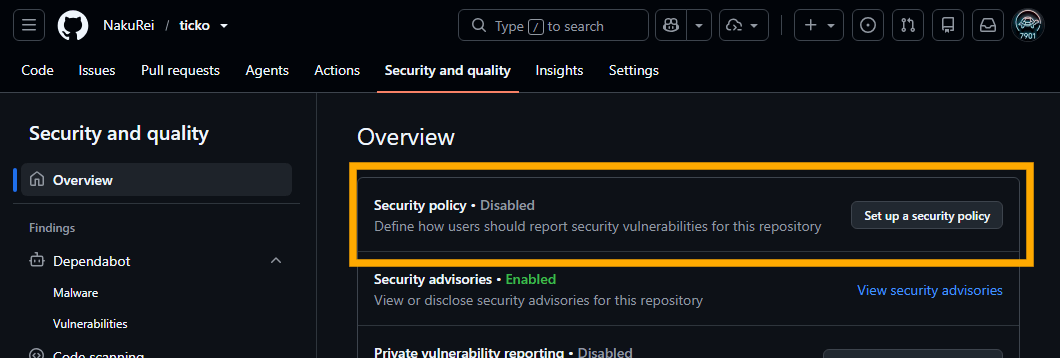
Clicking “Set up a security policy” in the screen above lets you create a SECURITY.md file in the repository root directly from GitHub.
This is just my opinion, but for a personal project, I think a security policy should include at least the following:
- Which versions receive security fixes
- Where vulnerabilities should be reported
- What information should be included in a report
- What should not be posted in a public issue
- An approximate response time
For vulnerability reports, GitHub’s Private Vulnerability Reporting (PVR) is convenient. I will cover that in the next section.
For example, in ticko, a Python package I maintain, I created the following SECURITY.md file.
# Security Policy

## Supported Versions

Security updates are provided for the latest major version of ticko.

| Version | Supported          |
| ------- | ------------------ |
| 2.x     | :white_check_mark: |
| 1.x     | :x:                |

Users are encouraged to upgrade to the latest release available on PyPI.

## Reporting a Vulnerability

If you discover a security vulnerability in ticko, please do not report it
through a public GitHub issue.

Instead, please report it privately using GitHub's private vulnerability
reporting feature.

When submitting a report, please include as much of the following information
as possible:

- A description of the vulnerability
- The affected version(s) of ticko
- Steps to reproduce the issue
- A minimal proof of concept, if applicable
- The potential security impact
- Any suggested mitigation or fix, if available

You can expect an initial response within 14 days.

Please allow reasonable time for the issue to be investigated and fixed before
publicly disclosing the vulnerability.

## Scope

Security reports should describe issues that have a meaningful security impact
on applications using ticko.

General bugs, timing inaccuracies, performance issues, feature requests, and
other problems without a security impact should be reported through the public
GitHub issue tracker instead.
Writing the SECURITY.md file itself does not take very long, since you can give an LLM the repository URL and have it draft one for you. You can also use security policies from other well-maintained projects as references.
2. Enable PVR (Private Vulnerability Reporting)
This is mainly useful for public repositories.
Private Vulnerability Reporting (PVR) is a GitHub feature that allows vulnerabilities in a repository to be reported privately. If you publish a project on GitHub, vulnerability reports should generally go through PVR rather than public issues.
To use PVR, you need to enable it in the repository settings. This only takes a moment.
First, open the repository’s “Security and quality” settings and find the “Private vulnerability reporting” section. If it shows as Disabled, as in the image below, PVR is currently turned off.
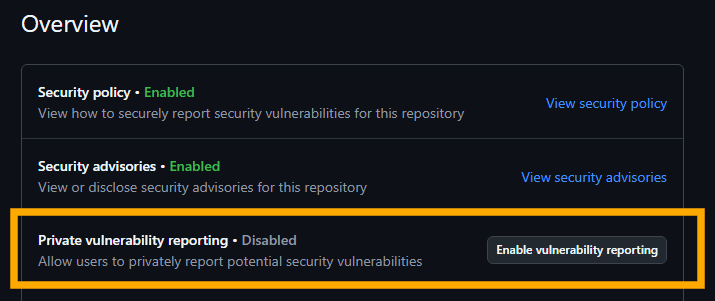
Clicking “Enable vulnerability reporting” opens the configuration screen shown below.
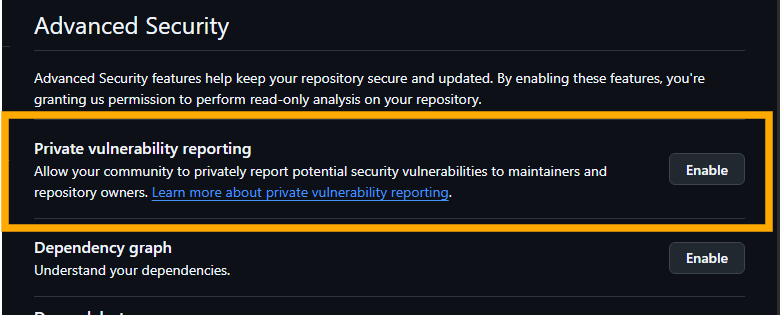
Click “Enable” to turn it on.
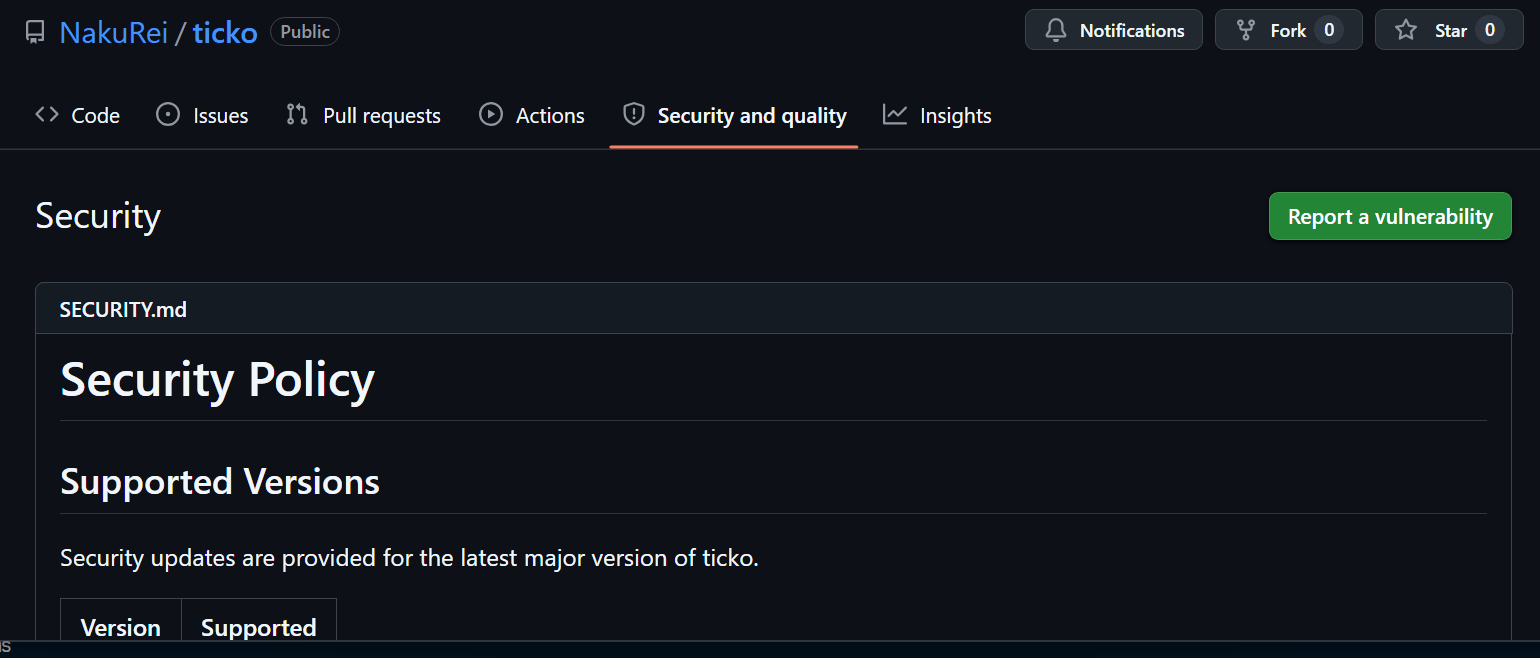
Once both steps 1 and 2 are configured, the repository’s “Security and quality” page will show the contents of the SECURITY.md file created in step 1, along with a “Report a vulnerability” button.
3. Enable Secret scanning alerts
This setting is available for public repositories, as well as private or internal repositories owned by an organization.
Secret scanning checks repositories for values that should remain secret, such as API keys and tokens, and alerts you if they have accidentally made their way into the repository. Think of it as one more line of defense against leaked credentials.
According to the article referenced above, AI-assisted commits leak secrets at roughly twice the usual rate. That’s a little scary.
To enable it, first open the repository’s “Security and quality” settings and find the “Secret scanning alerts” section. If it shows as Enabled, as in the image below, the feature is active.
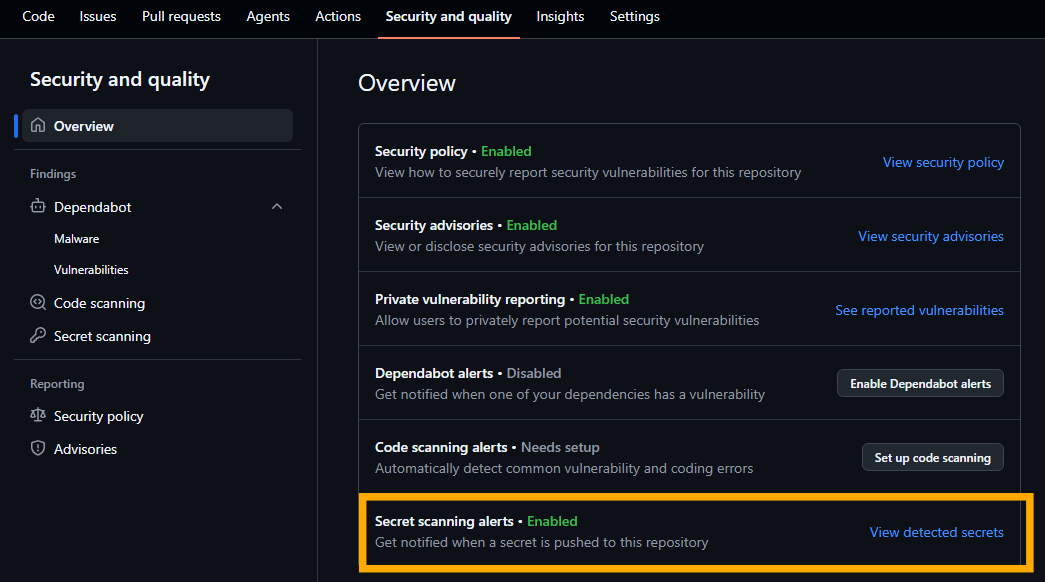
When this feature is enabled, GitHub will apparently raise an alert if it detects a leaked secret2.
If a leaked secret is actually detected, the official documentation below looks like a useful reference for how to respond.
4. Enable Dependabot
This setting is useful for both public and private repositories.
Dependabot warns you when an external library or package your repository depends on contains a known vulnerability.
For example, it checks dependencies listed in files such as package.json and alerts you when a security issue is found. By default, these alerts are also sent by email.
At the time of writing, Dependabot has five related features:
| Feature | Description |
|---|---|
| Dependency graph | Allows GitHub to identify and track the repository’s dependencies |
| Dependabot alerts | Warns you when a known vulnerability is found in a dependency |
| Dependabot security updates | Automatically opens PRs to update vulnerable dependencies to patched versions |
| Grouped security updates | Groups multiple security updates into a single PR |
| Dependabot version updates | Opens PRs periodically to update dependencies to newer versions |
Of these, Dependabot version updates is the only one that creates update PRs regardless of whether a vulnerability exists.
Personally, I consider Dependabot alerts to be the bare minimum. Because Dependabot alerts requires the Dependency graph, I decided to enable both.
To configure it, first open the “Security and quality” settings for the repository. If you see an “Enable Dependabot alerts” button like the one below, the feature is not currently enabled.
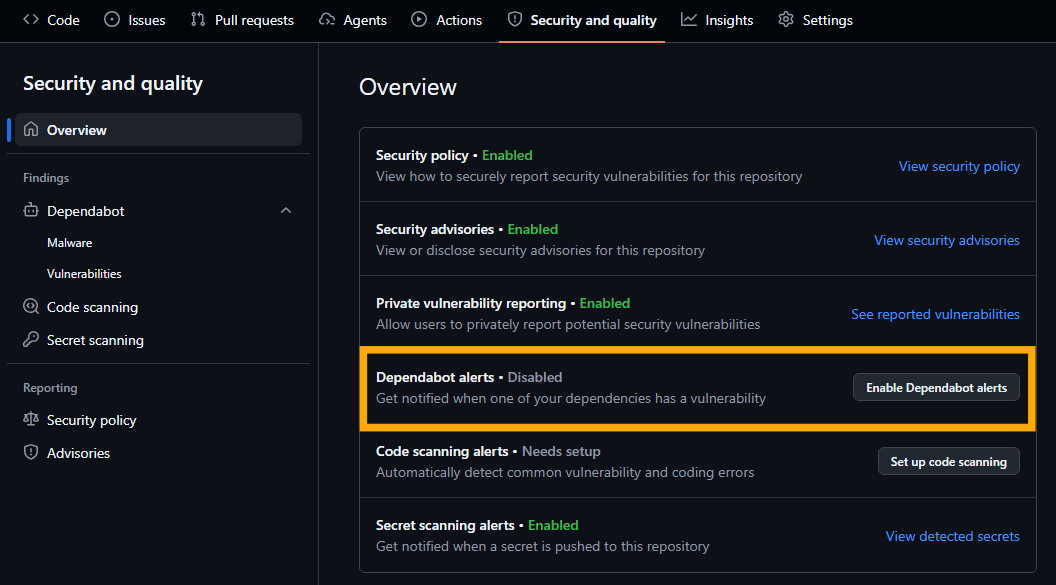
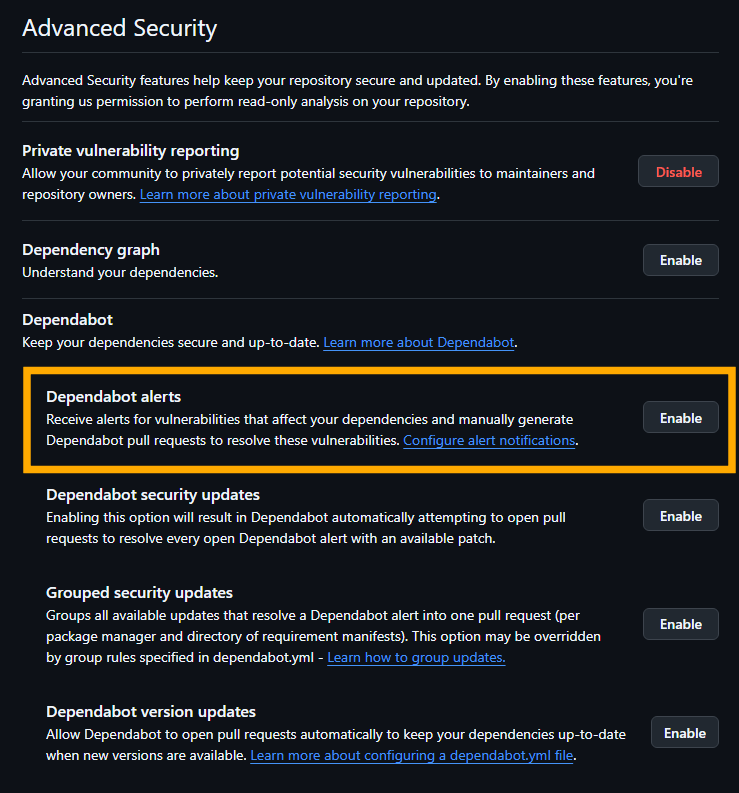
Clicking the button takes you to the Advanced Security settings page shown below. From there, click “Enable” in the Dependabot alerts section.
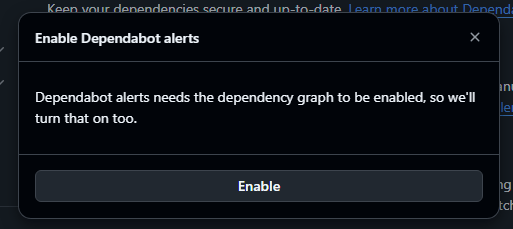
If the Dependency graph has not yet been enabled, GitHub will show a warning like the one below. There is no problem with this, so click “Enable.”
If the button now says “Disable,” as shown below, Dependabot alerts has been enabled successfully.
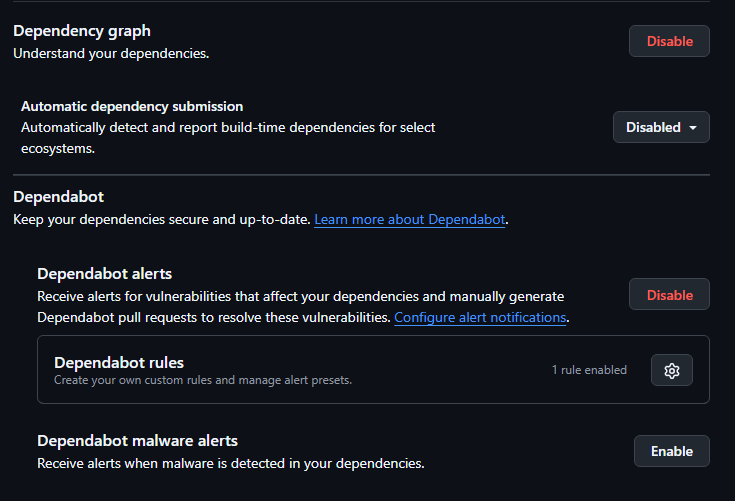
The “Dependabot malware alerts” option shown in the same screen also looked useful, so I enabled that as well.
5. Enable Code scanning
This can be enabled for public repositories or repositories owned by an organization.
Code scanning performs static analysis on the code in your repository to identify security vulnerabilities and coding errors. For example, it can flag issues such as SQL injection vulnerabilities.
Code scanning with CodeQL can also detect insecure GitHub Actions workflows. GitHub now provides a default CodeQL configuration that can be enabled with just a few clicks. Very convenient.
With the default setup, configuration is straightforward. First, check “Code scanning alerts” under “Security and quality” for the repository you want to configure.
If you see a “Set up code scanning” button like the one below, Code scanning has not yet been enabled.
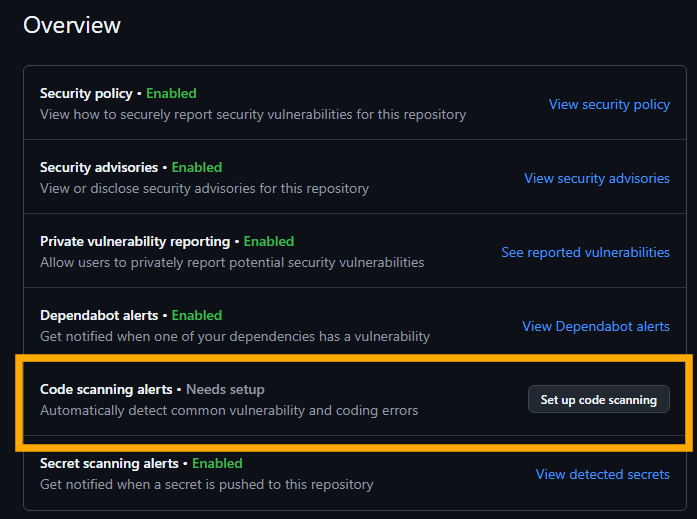
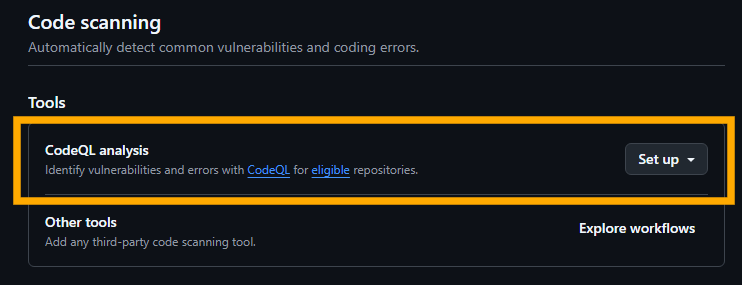
Clicking “Set up code scanning” takes you to the Advanced Security settings page. You can customize the configuration, but the simplest option is to use CodeQL with the default setup. If it has not yet been configured, you should see something like the screen below. Select “Default” from “Set up.”
GitHub then analyzes the repository automatically and generates a default configuration. If anything looks incorrect, you can edit it here.
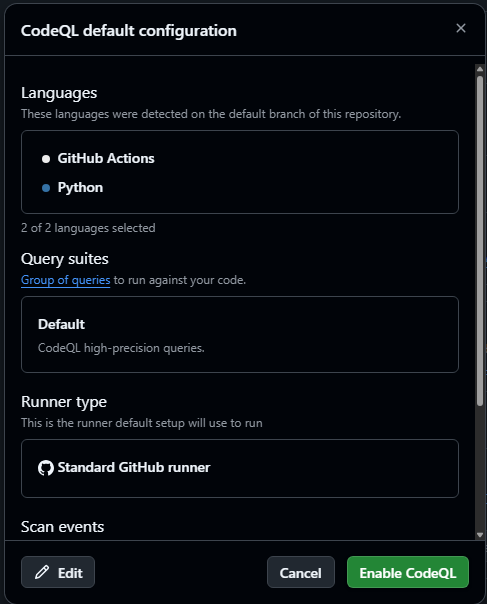
If the configuration looks correct, click “Enable CodeQL.” Setup takes a few minutes to complete.
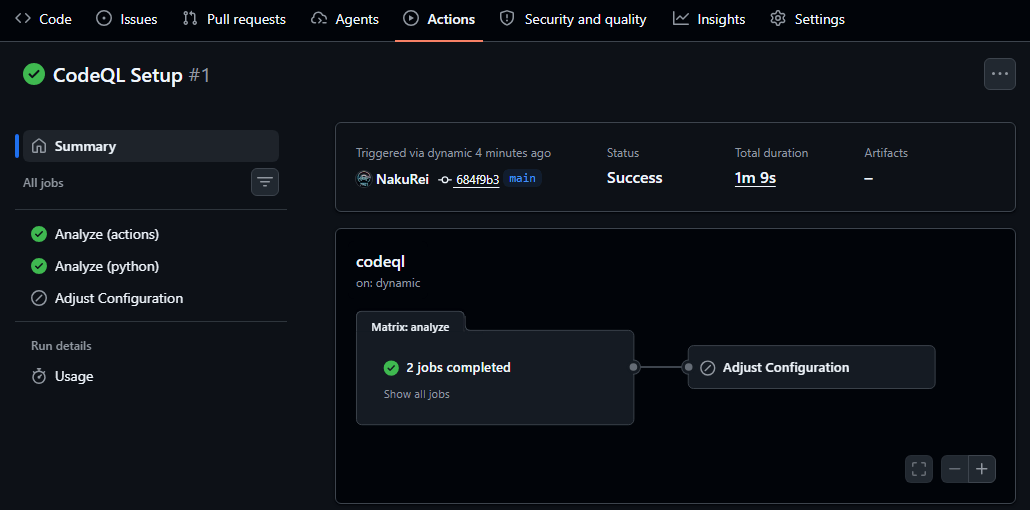
Once CodeQL is enabled and the scan has run successfully, the status will be shown in the settings.

You can check the scan results from the Actions tab on GitHub.
6. Protect the default branch
For most repositories, the default branch is probably main. You can protect this branch so that changes cannot be pushed directly to it. For example, you can require changes to go through a pull request and require at least one approval before merging.
Personally, I find this more annoying than useful for private repositories that I work on alone. For public repositories, however, simply preventing direct pushes to the default branch provides a significant benefit.
You can also make security checks part of the merge requirements, allowing Dependabot alerts or code scanning results to block a merge when necessary.
I had already configured this in the past, so see the article below for the details.


Wrapping up
It took me a while because I was researching each setting as I went, but in the end, the only parts that really take any time are writing the SECURITY.md file and protecting the default branch. Everything else is mostly just a matter of clicking “Enable” on a settings page.
So yes, apparently you really can get through all of this in under 30 minutes.
Any of these locations is fine. According to the official documentation, GitHub checks them in the following order of precedence:
.githubdirectory -> repository root ->docsdirectory. ↩︎I say “apparently” because this has never actually happened to me, so I have not seen it firsthand. Better that way, of course. ↩︎